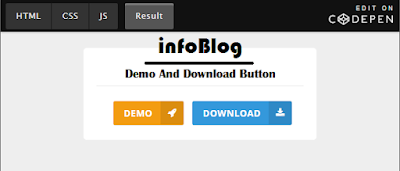
How To Make A Demo And Download Button - At this time, infoBlog will share a tutorial about How To Make A Demo And Download Button by using Font Awesome. On blogs that share templates, movies, and software will need the Demo and Download button.
This time, infoBlog will share a tutorial about How To Make A Demo And Download Button. Follow the steps below . .
How To Make A Demo And Download Button :
This widget uses Font Awesome, so please add the code below before </head>
<link href='//maxcdn.bootstrapcdn.com/font-awesome/4.5.0/css/font-awesome.min.css' rel='stylesheet'/>
- Go to your Blogger Dashboard ›› Template ›› Edit HTML.
- Add the code below before ]]></b:skin> or </style>
Style 1
Style 2
/* CSS Button Style 1 by www.infoaboutblog.blogspot.com */ .button{float:left;list-style:none;text-align:center;width:95%;margin:10px;padding:2px;font-size:13px;clear:both} .button ul{margin:0;padding:0} .button li{display:inline;margin:5px;padding:0;list-style:none} .button li a.demo,.button li a.download{position:relative;padding:9px 48px 9px 16px;background:#f39c12;color:#fff!important;font-weight:700;font-size:13px;text-align:center;text-transform:uppercase;letter-spacing:0.5px;border-radius:3px;box-shadow:0 1px rgba(0,0,0,0.1);line-height:normal;transition:all .3s} .button li a.download{background:#3498db} .button li a.demo:hover,.button li a.download:hover{background:#666} .button li a.demo:active,.button li a.download:active{cursor:pointer} .button li a.demo:after,.button li a.download:after{content:'\f135';background:rgba(0,0,0,0.1);position:absolute;right:0;top:0;font-weight:normal;display:inline-block;margin:0 0 0 10px;color:#fff;padding:11px;font-family:fontawesome} .button li a.download:after{content:'\f019'}
/* CSS Button Style 2 by www.infoaboutblog.blogspot.com */ .button2{float:left;list-style:none;text-align:center;width:95%;margin:10px;padding:2px;font-size:13px;clear:both} .button2 ul{margin:0;padding:0} .button2 li{display:inline;margin:5px;padding:0;list-style:none} .button2 li a.demo,.button2 li a.download{position:relative;padding:14px 48px 14px 16px;background:#f39c12;display:block;color:#fff!important;font-weight:700;font-size:13px;text-align:left;text-transform:uppercase;letter-spacing:.2px;border-radius:3px;box-shadow:0 1px rgba(0,0,0,0.1);line-height:normal;transition:all .3s;max-width:170px;margin:auto;overflow:hidden} .button2 li a.download{background:#3498db} .button2 li a.demo:hover,.button2 li a.download:hover{background:#666} .button2 li a.demo:active,.button2 li a.download:active{cursor:pointer} .button2 li a.demo:after,.button2 li a.download:after{content:'\F054';background:rgba(0,0,0,0.1);position:absolute;right:0;top:0;font-weight:normal;display:inline-block;margin:0 0 0 10px;color:#fff;padding:16px 24px;font-family:fontawesome;transition:all .3s} .button2 li:hover a.demo:after,.button2 li:hover a.download:after{background:transparent;-webkit-animation:bounceright .3s alternate ease infinite;animation:bounceright .3s alternate ease infinite} @-webkit-keyframes bounceright{from{-webkit-transform:translateX(0)}to{-webkit-transform:translateX(3px)}} @keyframes bounceright{from{transform:translateX(0)}to{transform:translateX(3px)}} - Then, click Save Template.
To use this feature, you only use the code below :
Style 1 :
<div style="text-align: center;"> <ul class="button"> <li><a class="demo" href="http://www.infoaboutblog.blogspot.com" target="_blank">Demo</a></li> <li><a class="download" href="http://www.infoaboutblog.blogspot.com" target="_blank">Download</a></li> </ul> </div> <div class="clear"></div>
<div style="text-align: center;"> <ul class="button2"> <li><a class="demo" href="http://www.infoaboutblog.blogspot.com" target="_blank">Demo Link</a></li> <li><a class="download" href="http://www.infoaboutblog.blogspot.com" target="_blank">Download Link</a></li> </ul> </div> <div class="clear"></div>
*NOTE
› Replace http://www.infoaboutblog.blogspot.com to your blog URL
- Change Compose mode into HTML mode in your posts. Then paste that code in the HTML column.
- After that, replace back in Compose mode and then click Publish to see the result.
Enough of tutorial about How To Make A Demo And Download Button. If you have any questions or suggestions, please write in the comments field below or directly send questions through the Contact Us service. Hopefully this article useful and you willing to share this article through social media accounts you have.
Thanks For Your Visiting 


EmoticonEmoticon